Tuesday, December 29, 2009

Cured/ Smoked Salmon - Part 1 of 2


Given that I have eaten nothing but smoked salmon sandwiches for breakfast for the past 3 months, there is a strong possibility that without it, I will cease to survive. So, it is with serious desire to avoid an untimely death before I even make it to the dreaded 3-0 that I embark on this two-stage process of curing and then smoking a side of salmon. The neufchatel that I typically schmear on my homemade whole-wheat sourdough will be sorely missed in 2010, but alas, I don't have the skill set to take on that beastly burden -- not yet anyways.

Curing a whole side of salmon is actually quite easy -- assuming you have the financial wherewithal to drop $60 at the rip-off that is your neighborhood foodie haven. Begin by cleaning the fish and scoring the skin side so that it does not curl up and the salt has a chance to fully penetrate the flesh. Liberally cover the salmon, top and bottom, with the cure as well as dill for flavor, and wait several days. At this point, the fish will be delicious but void of its signature smoky flavor. Slice some off for nibbling and then proceed to the smoking process -- to be described in detail in the coming week.

Makes 1 full side of salmon

4 cups sea salt or kosher salt
1 cup brown sugar
1 cup white sugar
1 side of salmon, about 4 pounds
1 bunch dill, washed and well dried
black pepper, to taste

1. In a large bowl, stir together salt, brown sugar, and white sugar.
2. Remove all of the pin bones from the fish. This is most easily accomplished by running your index finger down the center of the fillet until you feel something hard and pointy. Using needle-nose pliers, carefully extract each bone.
3. Using a sharp boning knife, remove any visible white membranes from the surface.
4. Score the skin side of the fish deeply enough to penetrate the skin but not the flesh. Do this in 3 long diagonal strokes.
5. Place a wire rack on a baking sheet. Place a piece of cheesecloth large enough to fully envelope the fish on the rack.
6. Sprinkle a thick layer of the salt/sugar mixture onto the cheesecloth. Lay several sprigs of dill on top of the cure.
7. Lay the fish, skin side down, on top of the dill.
8. Season the flesh liberally with black pepper. Place the remaining sprigs of dill on the flesh.
9. Cover the top and sides of the salmon with the remaining cure. Make sure that you cannot see any of the flesh poking out of the cure.
10. Pull the cheesecloth up and over the top, covering the entire fish.
11. Place a baking sheet on top of the fish and weigh it down with a heavy pot.
12. Place the entire apparatus in the refrigerator for 3 days.
To be continued...

Tweet, Tweet


With the January 1st start date looming, I finally succumbed to the madness that is Twitter! You can follow me there @kboehmgoodnick

Here's to using technology to share my love for food in 2010, not to create the food I eat!

(Instead of their dove-like logo, I chose to supplement this mini-post with a photo of the truffle-studded, roasted capon -- aka "nutless" rooster -- that we served on Christmas day.)

Monday, December 28, 2009

Winter Squash Soup


These days, it seems that I just can't stay out of my own kitchen -- something that I attribute to the fact that for the first time in 10 years, I do not have an insanely high-stress job which requires me to slave away in someone else's kitchen for 80-plus hours a week. When I saw this squash at the market, the beauty in its gnarled ugliness was irresistable. At first, I couldn't bring myself to hack into it, but today, it practically begged me to turn it into soup.

I chose a turk's turban, but you can use any winter squash of a similar size. Sprinkling the onions with salt brings out moisture and allows them to cook without burning. Add a couple of pears to the mix to sweeten things up. To make the soup vegetarian, simply substitute water for the chicken stock -- although, I prefer the taste of a velvety stock. If you do not have a fine mesh sieve, don't fret; just be sure to blend the soup long enough to remove any lumps.

Take advantage of the last few days of Christmas lights, warm a crusty loaf, pour a glass of hearty red wine, and enjoy.

Serves 6

1 winter squash (about 4 pounds)
3 tablespoons olive oil
2 yellow onions, thinly sliced
salt, to taste
1 cup white wine
2 pears, peeled, cored and roughly chopped
5 1/2 cups chicken stock
pinch cayenne pepper
pinch ground nutmeg
1/4 cup plain yogurt
1 tablespoon sherry
1 bunch chives, finely chopped

1. Set the oven at 350 degrees.
2. Roast the entire squash on a baking sheet for 1 1/2 hours or until the squash is tender throughout.
3. Cut the squash in quarters. With a spoon, remove and discard the seeds. Scrape out and set aside the pulp.
4. In a large stock pot, heat 3 tablespoons olive oil over high heat. Add the onions to the pot and sprinkle them with salt; stir well. Sauté for 5-10 minutes or until the onions are tender and have begun to color, stirring occasionally.
5. Deglaze the pot with 1 cup white wine. Bring the liquid to a boil, and reduce it by 2/3.
6. Add chicken stock, pear, and cooked squash. Stir. Bring to a boil. Reduce to a simmer, and cook for 30 minutes. Stir frequently to avoid burning the bottom.
7. Season with cayenne, nutmeg, and sherry. Stir in yogurt.
8. Working in small batches, puree the soup in a blender or a food processor.
9. Pass the soup through a fine mesh sieve. Re-warm the soup if necessary.
10. Garnish each bowl with chives.

Friday, December 25, 2009

Spiced Pecans


All of my holiday memories involve my mother’s kitchen – from the Christmas goose to painstakingly decorating gingerbread guys and gals to resemble each one of my 17 cousins. This recipe for spiced pecans is by far the most basic, but it has always been my favorite. Whisk the egg whites and water, toss in the nuts, and coat with sugar n spice. Whipping up a large batch to round out the holiday gift list is no more difficult than making a few for an intimate gathering. The pecans will keep for a week in a tin or covered container. However, if you make them too far ahead of time, there won’t be any left for your guests.

Makes 1 pound

Butter for the pan
1 egg white
1 teaspoon cold water
1 pound large pecan halves
1/2 cup sugar
1/4 teaspoon salt
1/2 teaspoon cinnamon

1. Set the oven at 225 degrees. Have on hand a rimmed baking sheet. Butter the pan.
2. In a large bowl, whisk the egg whites and water until frothy. Stir in the pecans; mix until they are well coated.
3. In a small bowl, mix sugar, salt, and cinnamon. Pour over the nuts, and mix well.
4. Spread the pecans on the baking sheet. Bake for 1 hour, stirring every 15 minutes.
5. Store in an air-tight container for up to 1 week.

Pictured here are 3 of those 17 cousins (and me) at Christmas around 1982. Wishing you all a very Merry Christmas!

Wednesday, December 23, 2009

From Pork Roast Comes Delicious Banh Mi


From the Boston Globe -- December 23, 2009

Roasting, wrote the great American cook James Beard, is one of the most spectacular forms of cooking. As luck would have it, an ordinary home oven does a pretty wonderful job of roasting. Perhaps that’s why a roast was the traditional centerpiece of the midday Sunday dinner for so long. It’s still a good choice for the celebration table. Pork loin, a popular cut sold on and off the bone (boneless is easier to handle when it’s time to carve) has a reputation for being dry and a little bland after roasting. No doubt the classic accompaniments of applesauce and gravy were intended to mask that. We rub the meat with soy sauce and salt and let it sit for half an hour (or half a day). That gives color to the finished pork and lends a good flavor to the next day’s Asian recipes. During roasting, brush the meat with a honey and jalapeno glaze.

The next day, turn the pork into a tasty Vietnamese banh mi. These sandwiches, made on French baguettes, began as street food and have developed a cult-like following. Begin with an Asian dipping sauce; mix a few tablespoons of the sauce into mayonnaise and use this dressing with cucumbers, carrot matchsticks, and lots of chilies to layer with thinly sliced pork in crusty loaves. Then sprinkle with chopped peanuts and garnish with fresh cilantro. From Main Street to Saigon all in one roast.

Glazed Pork Roast

Serves 4 with leftovers

1 boneless pork loin (about 4 pounds)
1/4 cup soy sauce
Salt and black pepper, to taste
3/4 cup honey
1 jalapeno or other small chili pepper, cored, seeded, and finely chopped
1/4 cup spicy mustard
1 clove garlic, finely chopped

1. Rub the meat with soy sauce and sprinkle with salt. Set in a dish large enough to hold it. Cover and refrigerate for 30 minutes or up to several hours.
2. Set the oven at 350 degrees. Have on hand a roasting pan and rack.
3. Line the pan with foil. Place the rack in the lined pan. Set the meat, fat side up, on the rack. Sprinkle with black pepper.
4. In a saucepan, combine the honey, jalapeno, or chili pepper, mustard, and garlic. Bring to a boil and simmer for 3 minutes. Brush the meat with the honey mixture. Roast the meat for 1 hour, brushing with the honey mixture every 15 minutes, or until a meat thermometer inserted into the center of the meat reaches 140 degrees.
5. Turn the oven temperature up to 450 degrees. Glaze the meat again, and roast for 5 minutes. The glaze should be crispy and dark brown.
6. Set the meat in a warm place; the internal temperature will rise to 145 degrees. Cut into thick slices.

Banh Mi (Vietnamese Sandwiches)


From the Boston Globe -- December 23, 2009

Serves 4

ASIAN DIPPING SAUCE

2 tablespoons soy sauce
1 1/2 teaspoons Asian fish sauce
2 tablespoons seasoned rice vinegar
1/2 teaspoon hot sauce (such as Sriracha), or to taste
1 piece ( 1/2-inch) fresh ginger, finely chopped
1 clove garlic, finely chopped
1 scallion, thinly sliced
1/2 teaspoon sugar

1. In a bowl, combine the soy sauce, fish sauce, rice vinegar, hot sauce, ginger, garlic, scallion, and sugar.
2. Stir well.

SANDWICHES

1/2 cup mayonnaise
3 tablespoons Asian dipping sauce (see above)
1 carrot, cut into matchsticks
1/2 cucumber, thinly sliced
1 jalapeno or other hot chili pepper, cored, seeded, and thinly sliced
4 scallions, thinly sliced
3 cups sliced roast pork
2 baguettes, split horizontally
1/2 bunch cilantro, leaves pulled off
1/4 cup peanuts, chopped

1. In a bowl, mix the mayonnaise and dipping sauce. Add the carrot, cucumber, jalapeno or other chili pepper, and scallions. Toss well.
2. Layer vegetables and dressing with the pork on the baguettes. Add cilantro and peanuts to each. Halve each baguette to make 4 sandwiches.

Saturday, December 19, 2009

Caesar's Clams


In the 1970's, my mom attended a classic French cooking school called Dumas Pere. During these classes, several of the students joined together to form a gourmet dinner party group. As an infant, I was allowed to attend these parties; I have a little chuckle each time I see the picture of my dad holding a bulbous Bordeaux glass up to my tiny newborn nose so that I might appreciate the aromas of what I am sure must have been a very elegant wine. As I got older -- read more annoying -- I usually watched T.V. upstairs and came down only to sample desserts. Desserts were always my favorite part -- occasionally, I would wait until the next day to wolf down the leftover cake or tart as my breakfast before anyone else was awake. Eventually, I began to take more interest in their soirées. I even tried to replicate a fancy dinner for my parents as a surprise when they had left me home to babysit my brother. Oh, I do pity them for having to smile and choke down whatever atrocity my 10 year old self managed to throw together. By the time I could really participate in these dinners, the group had shrunk to only four. Luckily, it was my favorite four: my parents plus Jerry and Madelyn.

In their most recent dining adventures, there has been one consistently present dish; Caesar's clams. Caesar, Madelyn's father, created a recipe for baked clams that is at once both simple and exquisite. They served them on Christmas Eve -- just before a big bowl of cioppino. It's classic -- nothing fancy here. Classics endure for a reason. You'll know why if you try it. I made them for our holiday party this week, and they were a hit. So, thank you, Maddy, for years of inspiration and support. And, many, many thanks for sharing your dad's recipe.

If I were to make this recipe, I might change a few things. For example, I like to make and season my own bread crumbs. However, the recipe is just right, just as it is.

2 dozen little neck clams
2 teaspoons dried oregano
1 tablespoon garlic powder
1/2 cup Progresso Italian bread crumbs
olive oil, to taste
lemon wedges and parsley sprigs, for garnish
hot sauce, to taste

1. Set the oven at 375 degrees. Have on hand a baking sheet lined with aluminum foil.
2. In a microwave on medium power, heat the clams for 30 seconds or until they begin to open. (You may also do this on the stove in a heavy bottomed sauce pot.) Either way, you don't want to cook the clams, merely open them.
3. Carefully shuck each clam, discarding the top shell and loosening the clam from the bottom shell. Place on the baking sheet.
4. Top each clam with oregano, garlic powder, and bread crumbs.
5. Drizzle the olive oil over the top.
6. Bake for 5 to 10 minutes, or until the breadcrumbs are golden brown.
7. Garnish with lemon and parsley. Season with hot sauce, if you like.

These photos are courtesy of my mom. She's pictured on the right; Maddy is on the left.

Thursday, December 10, 2009

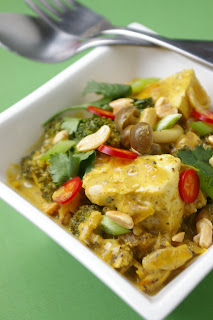
Waste Not, Want Not Curry


Even though we have yet to determine the final guidelines for 2010, we are moving forward with the project. In an effort to rid our pantry of "processed foods" -- however you may define them -- we wanted to use up ingredients that we knew would not fit into the plan. For this recipe, we used commercially produced coconut milk, pre-blended curry powder, chili paste, and fish sauce. While we wouldn't categorize these items as inherently unhealthy, we will attempt to make or substitute our own homemade versions in the new year. The result was far tastier than take-out and almost as easy.

The pork in this dish was left from a Sunday roast. Feel free to use other leftovers or a raw cut like pork steak. To make this recipe vegan, simply omit the meat and the fish sauce. We used Szechuan chili paste (to ban jan), but you may use Sriracha, Sambal Olek, or even fresh chilis. This recipe is best served with rice; we like brown basmati rice for its low glycemic index value. You may garnish with scallions, chilis, lemon juice, cilantro, or peanuts.

1 teaspoon canola oil
5 ounces pork, finely chopped
1 white onion, finely chopped
5 cloves garlic, minced
1 piece (1-inch) ginger, minced
1 piece (1/2-inch) fresh tumeric, minced or 1 teaspoon ground tumeric
Zest of 1 lemon, finely chopped
2 cups broccoli florets
1 cup mushrooms, chopped
1 teaspoon curry powder
1 teaspoon chili paste
1 tablespoon fish sauce
1/4 cup rice wine or dry sherry
1-12 ounce package firm tofu, cut into 1-inch cubes
1 can (13.5 ounces) coconut milk
Salt and pepper, to taste

1. In a large wok or saute pan, heat the oil over high heat.
2. Add the pork, and saute for 5 minutes or until crispy.
3. Add onion, garlic, ginger, tumeric, and lemon zest. Saute for 3 minutes, or until the vegetables release their aromas.
4. Stir in broccoli, mushrooms, curry powder, and chili paste. Toss to coat.
5. Add fish sauce, rice wine, tofu, and coconut milk.
6. Bring liquids to a boil. Reduce to a simmer, and cook for 5 minutes or until broccoli is tender.
7. Taste for seasoning, and add salt and pepper.
8. Serve warm with rice. Garnish with any of the following: lemon juice, peanuts, cilantro, scallions, and chilis.

Tuesday, December 8, 2009

Christmas Cookies on Girls Guide to the Galaxy


As posted by Carlie on Girls Guide to the Galaxy -- she is much too kind!

http://girlsguidetothegalaxy.com/2009/12/08/christmas-cookie-classics/

The holidays are a great excuse to stuff ourselves silly and not feel guilty about it because as the oft-used justification goes, “It’s a special occasion.” It is the time of year when people young and old take to their kitchens to produce baked goods with wild abandon. Probably the most beloved of all holiday treats is the one and only thing Santa himself demands in exchange for his lavish and physically demanding gift-giving efforts: the Christmas cookie.

Since I’ve proven myself to be pretty useless in the kitchen on most accounts, I decided to ask Karoline Boehm-Goodnick, a San Francisco pastry chef (and in the interest of full disclosure, my husband’s cousin’s wife), for some of her favorite Christmas cookie recipes. Below is what she sent, and in my personal opinion, they all sound delicious! For more of her recipes and chronicles of her attempt to eat only unprocessed food in the year 2010 (ambitious!), check out her excellent blog, Sweet Karoline: Adventures in Food and resist the urge to lick your computer screen – she’s also a food stylist, and the photos are amazing!

Grandma Esther’s Spritz Cookies

No Christmas table is complete without these miniature trees, candy canes, and rosettes. A classic recipe, my favorite are the Christmas trees, tinted green and covered with shimmering red and green sprinkles. If you want to tint the dough, it is easiest to add the food coloring with the butter. Use more drops than you think necessary; there is a lot of flour to be added later. Use ungreased baking sheets so that the cookie sticks to the pan as you are piping them—don’t worry, they won’t stick during baking. If you don’t have a cookie press, you can use a piping bag fitted with a star tip – it is a little more difficult, and the cookies won’t be so uniform, but the results will be just as delicious.

Makes 3 to 4 dozen cookies

Ingredients

1 pound (4 sticks) butter, at room temperature
1 cup sugar
2 egg yolks
1 teaspoon vanilla
1 teaspoon baking powder
5 cups flour
Pinch of salt
Sprinkles for decorating

Directions

1. Set the oven at 350 degrees. Have on hand a cookie press and several baking sheets.
2. In the bowl of an electric mixer fitted with the paddle, cream the butter and sugar until light and fluffy, approximately 3 minutes on medium high.
3. Scrape down the sides of the bowl, and mix in egg yolks and vanilla.
4. Sift baking powder, flour, and salt. Mix in dry ingredients, on low speed, until flour is incorporated.
5. Using a cookie press, press onto an ungreased cookie sheet approximately one inch apart. If you would like to decorate the cookies with sprinkles, do so at this time.
6. Bake for 12 minutes, or until the edges of the cookies begin to brown very slightly.
7. Using a spatula, carefully remove cookies from the pan to cool on a rack.
8. Store in an air-tight container for up to 1 week.

Christmas Crescents

In my family, these treats always came in the shape of a crescent moon, but many friends have told me that their families make the same recipes in ball shape. Feel free to try either one.

Makes approximately 2 dozen cookies

Ingredients

½ pound (2 sticks) butter, at room temperature
5 tablespoons sugar
1 tablespoon water
2 teaspoons vanilla
2 cups flour
¼ teaspoon salt
2 cups chopped pecans
Butter for greasing the pan
Powdered sugar for rolling

Directions

1. Set the oven at 325 degrees. Have on hand several baking sheets.
2. In the bowl of an electric mixer fitted with a paddle, cream butter and sugar until light and fluffy, approximately 3 minutes on medium high.
3. Scrape down the sides of the bowl, and mix in water and vanilla.
4. Sift flour and salt. Add flour, salt, and pecans to bowl. Mix until just combined.
5. Take 1 teaspoon of dough into your hand, and shape it into a crescent. Place onto a greased cookie sheet. Repeat with the remaining dough.
6. Bake for approximately 20 minutes, or until the bottoms begin to brown.
7. Cool on a wire rack for at least 10 minutes.
8. Roll the cookies in powdered sugar to coat the outsides. Be careful, as the cookies are extremely delicate. Cool completely on a rack.
9. Store in an air-tight container for up to 1 week.

Mom’s Gingerbread Cookies

This recipe for gingerbread cookies is the same one that my mom used every year when I was a kid. We had 6-inch cutters to make giant gingerbread men and women, but you can use any size. The dough rolls out far easier than any I have ever worked with – no need to chill it or wait for it to relax. Decorate as you like. A piping bag, a spatula, and several colors of icing will keep the kids occupied for hours.

Makes approximately 3 dozen cookies

Ingredients

COOKIES

½ cup sugar
½ cup molasses
1 ½ teaspoons ground ginger
1 teaspoon ground allspice
1 teaspoon ground cinnamon
1 teaspoon ground cloves
2 teaspoons baking soda
½ cup (1 stick) butter, cut into pieces
1 egg, beaten
3 ½ cups flour
Flour for the board and cutters

Directions

1. Set the oven at 325 degrees. Have on hand several baking sheets and cookie cutters.
2. In a 3-quart saucepan, bring sugar, molasses, ginger, allspice, cinnamon, and cloves to a boil, stirring occasionally.
3. Remove saucepan from heat, and stir in baking soda. Mixture will foam up and become frothy.
4. Stir in butter until fully melted. Stir in egg.
5. With a rubber spatula, stir in flour. When the dough has mostly come together, turn it out onto a lightly floured surface. Knead until all is incorporated.
6. Divide dough in half. Wrap half in plastic, and set aside.
7. Using a rolling pin, roll out unwrapped dough to ¼ inch thick.
8. Using a floured cookie cutter, cut out each cookie, placing them on a greased baking sheet, approximately 1 inch apart.
9. Bake cookies for 12 minutes, or until the edges begin to brown. Remove cookies from pan, and cool on a wire rack.

ICING

Ingredients

2 egg whites
2 teaspoons lemon juice
3 cups powdered sugar, sifted
Food coloring (optional)

Directions

1. In the bowl of an electric mixer, fitted with a whisk, beat egg whites, lemon juice, and powdered sugar until stiff, about 5 minutes on high speed.
2. Tint icing with a few drops of food coloring, if you like. Immediately transfer to an air-tight container or a piping bag, as icing will harden very quickly.
3. Cover the unused icing with plastic wrap, pressing it to the surface to keep the icing from forming a skin.
4. Decorate cookies. Allow them to dry for several hours before stacking or placing in a container.
5. Store in an air-tight container for up to 1 week.

Carlie is the Food and Drink Editor for Girls Guide. By day she is an educational textbook editor, and she moonlights as a foodie and barfly. You can email her at carlie [at] girlsguidetothegalaxy [dot] com, and you can follow her on Twitter – @carbirwin.

Wednesday, December 2, 2009

Bittersweet Chocolate Flats


I styled this photo over two years ago. Imagine my surprise when it showed up in today's Boston Globe! (photo shot by Wendy Maeda)

Bittersweet chocolate flats
December 2, 2009

Makes 2 1/2 to 3 dozen

Bliss is when a generous bar of bittersweet chocolate is chopped and mixed into a buttery dough with just enough flour, salt, and eggs to form a mixture that bakes into golden, crunchy flats. The secret ingredient, one that makes an ordinary cookie into a great one, is a small amount of apple cider vinegar. You won’t notice it. The vinegar accentuates gentle caramel overtones in the brown sugar. The dough is loaded with shards of bittersweet chocolate, which will leave messy, deep brown prints on your fingers. This is part of their freshly baked, ooze-with-chocolate charm.

2 cups flour
1 teaspoon baking soda
3/4 teaspoon salt, preferably fine sea salt
1 cup (2 sticks) unsalted butter, at room temperature
1 cup firmly packed light brown sugar
1/2 cup granulated sugar
2 eggs
2 3/4 teaspoons vanilla extract
1/4 teaspoon apple cider vinegar
2 1/4 cups chopped bittersweet chocolate (between 60 and 65 percent cocoa)

1. Set the oven at 350 degrees. Line several baking sheets with parchment paper.

2. In a bowl, whisk the flour, baking soda, and salt just to blend them.

3. In an electric mixer, cream the butter on medium-low speed for 3 minutes. Add the light brown sugar in 2 additions, beating well after each one. Add the granulated sugar in 2 additions, beating well after each one. Add the eggs, one at a time, beating until just incorporated. Blend in the vanilla and vinegar.

3. With the mixer set on low speed, mix in the flour mixture in 2 additions, scraping down the sides of the bowl often. Remove the bowl from the mixer stand. Stir in the chocolate.

4. With a large spoon, make rounded 2 tablespoon mounds of batter and set them on the baking sheets, arranging them 3 inches apart (6 to 8 per sheet; the cookies spread).

5. Bake the cookies for 13 minutes or until set and golden. Let them stand on the sheets for 1 minute, then transfer to racks to cool. Store in an airtight tin. Lisa Yockelson

**For more holiday baking ideas, check out my cookie recipes in Carlie Irwin's post next week at www.girlsguidetothegalaxy.com

Brandied Raisin-Nut Cake

In today's Boston Globe is a cherished recipe that I learned from my mom. I can sense your skepticism, but trust me, it's amazing and totally worth the effort.

JOY OF BAKING
Brandied raisin-nut cake
December 2, 2009

Makes one 10-inch cake

At the holidays when I was a child, a large tin in the dining room held a fruit-laden cake that fascinated me. I really wanted to try some right after my family made it at the beginning of December, but the cake was soaking in brandy. This isn’t one of those red-and-green-studded cakes everyone has strong (mostly negative) opinions about. Our family’s is made with select dried fruits (I prefer figs, dates, apricots, currants, and raisins), soaked overnight with walnuts in brandy. (Tip: When you chop the fruits, coat your knife with pan spray to prevent them from sticking.) Make the batter in an electric mixer or in an oversize bowl with a hand-held mixer. Wrap the outside and inside of a 10-inch tube pan with foil so the batter does not leak. After baking, wrap the cake in brandy-soaked cheesecloth and several layers of foil. Aging for at least two weeks mellows the flavors and softens the fruit, but keep the cheesecloth moist to prevent the cake from drying out. On Christmas morning, I always ripped open Santa’s packages and made a beeline to the kitchen to devour a piece of fruit cake. Brandy and all. Maybe that’s why I have such fond memories.

8 cups chopped dried fruit (such as figs, dates, apricots, currants, apples, peaches)
1 cup raisins
2 cups coarsely chopped walnuts
1 1/2 cups brandy
Butter (for the pan)
3 cups flour
1 teaspoon baking soda
1 teaspoon ground nutmeg
1 teaspoon ground cinnamon
1 teaspoon ground ginger
1/4 teaspoon ground cardamom
1 cup (2 sticks) butter, at room temperature
1 1/2 cups brown sugar
4 eggs
Extra brandy (for soaking)

1. In a large bowl, mix the dried fruits, raisins, walnuts, and brandy. Cover with plastic wrap; soak overnight.

2. Set the oven at 275 degrees. Butter a 10-inch tube pan. Wrap the outside in heavy duty foil. Line the inside walls with a large strip of foil. Butter the foil.

3. In a large bowl, whisk the flour, baking soda, nutmeg, cinnamon, ginger, and cardamom to blend them.

4. In an electric mixer, beat the butter until soft and fluffy. Beat in the brown sugar. Scrape down the sides of the bowl. Beat in the eggs, one at a time.

5. Remove the bowl from the mixer stand. With a large metal spoon, fold in the flour mixture. Then stir in the soaked fruits, nuts, and brandy. Spoon the batter into the pan, and smooth the top with the spatula. Cover the pan with foil, crimping the edges to seal them.

6. Bake the cake for 4 hours, rotating the pan from front to back after 2 hours. Raise the oven temperature to 325 degrees, remove the foil, and continue baking for 30 minutes. (Total baking time is 4 1/2 hours.) The cake will be very dark.

7. Cool the cake in the pan. Turn it out onto a large deep plate. Peel off the foil. Soak several layers of cheesecloth large enough to cover the top of the cake in brandy. Place the cheesecloth on top of the cake. Re-wrap the entire cake in foil. Set in an airtight tin or cover with plastic wrap. Set on a large plate.

8. Store in a cool, dry place for at least 2 weeks, resoaking the cheesecloth after 1 week.

Thursday, November 26, 2009

Pumpkin Bundt Cake


Until recently, I was a skeptic about vegan pastries. Really, how could a cake made without eggs, butter, cream, etc actually taste good? This recipe convinced me that some vegan goods are not only edible, but they are better than full fat carnivorous versions! Moist and light, this cake works well for breakfast as well as dessert. Either way, it's great with a cup of coffee. Look for ingredients like date sugar and barley flour at a health foods store. If you can't find date sugar, substitute maple syrup. You may use canned pumpkin (just choose the unseasoned, plain variety), but I prefer to roast my own. I recommend a combination of squash and sweet potato. Roast them in a 325 degree oven for about an hour, or until they are very soft. Set them aside to cool, remove the skins, and puree in a food processor. Don't worry if you have more than the recipe calls for -- use the leftovers for dinner!

Makes 1 - 10 inch Bundt Cake

Oil for greasing the pan
Flour for dusting the pan
1 1/2 cups pecans
3/4 cup golden raisins
1 1/2 cups pumpkin or sweet potato puree
1/2 cup canola oil
1/2 cup maple syrup
1 1/2 cups soymilk
2 teaspoons apple cider vinegar
4 teaspoons vanilla extract
1/2 cup date sugar
3 1/2 cups barley flour
2 teaspoons baking soda
2 teaspoons baking powder
4 teaspoons ground cinnamon
2 teaspoons ground ginger
1 teaspoon ground allspice
3/4 teaspoon ground cloves
1/4 teaspoon grated nutmeg
1 teaspoon salt

1. Set the oven at 350 degrees. Oil the bundt pan and dust lightly with flour.
2. Place pecans on a baking sheet. Toast for 10 minutes. Cool completely, and chop roughly.
3. Cover raisins with boiling water. Let soak for 25 minutes. Drain and set aside.
4. In a bowl, whisk together pumpkin, oil, syrup, soymilk, vinegar, and vanilla.
5. In a large bowl, use a clean whisk to mix date sugar, flour, baking soda, baking powder, spices, and salt. (If you whisk well, you do not have to sift the dry items.)
6. Using a rubber spatula, fold the pumpkin mixture into the dry ingredients. When the dry ingredients are halfway incorporated, add the raisins and the chopped pecans. Continue folding just until the mixture comes together. Do not overmix.
7. Pour batter into prepared pan. Smooth the top with a rubber spatula.
8. Bake for 45 minutes, rotating the cake from front to back after 20 minutes, or until a toothpick inserted into the center comes out clean.
9. Cool in the pan for 15 minutes.
10. Invert the cake onto a wire rack. Continue cooling. Transfer to a plate, and dust with powdered sugar. Serve warm or at room temperature.

Wednesday, November 25, 2009

Turkey Salad with Mayfair Dressing


I had forgotten about this recipe until a link showed up on this year's Thanksgiving issue of the Boston Globe online. The recipe for the dressing came from my mother-in-law. It's a great way to use up leftovers!

Turkey salad with Mayfair dressing
By Karoline Boehm Goodnick, Globe Correspondent | November 24, 2008

Serves 4

Turkey sandwiches with cranberry chutney are delectable later that evening or for lunch the next day, and a pot of soup is a fine way to recycle the carcass. Here's another use for the rest of the meat. Make a light curried mayonnaise-style dressing - a similar one was originally served at the Roberts Mayfair Hotel, a historic property in St. Louis. Add the dressing to your cooked bird with red grapes and shelled pistachios, or stir in leftover green beans, chunks of roasted squash, or Brussels sprouts. Hold the pie. That's for later.


1/2 stalk celery, chopped
1/2 medium onion, chopped
1 large clove garlic
1/2 tin (2 ounces) anchovies, drained
Juice of 1/2 lemon
1/2 teaspoon curry powder
Salt and pepper, to taste
2 tablespoons yellow mustard
1/2 teaspoon sugar
1 egg plus 1 extra yolk
1/2 cup olive oil
1/2 cup vegetable oil
1/2 bunch parsley
8 cups (2 pounds) chopped cooked turkey
1 1/2 cups red seedless grapes, cut in half
1 cup shelled pistachios

1. In a blender, combine the celery, onion, garlic, anchovies, and lemon juice. Blend into a puree.

2. Add the curry powder, salt, pepper, mustard, and sugar; blend well.

3. Remove the cap in the blender lid and with the motor running on medium speed add the egg and extra yolk, then slowly drizzle in the olive and vegetable oils.

4. Add the parsley and blend until it is coarsely chopped. Chill the dressing for 30 minutes.

5. In a large bowl, combine the turkey, grapes, and pistachios. Add enough dressing to moisten the mixture well. Taste for seasoning and add more salt and pepper, if you like.

I styled the photo above, and it was shot by Wendy Maeda.

Saturday, November 21, 2009

Processed vs. Unprocessed


Between out of town guests and desperately trying to finish my thesis, I have been way too busy for words. In theory, by this time next week, I will have already submitted the final version of the thesis that has taken me all of 2009 to write. Yikes!

In the meantime, Ben and I have been mulling the concept of processed vs. unprocessed foods. How does one define them? How does the technical definition of unprocessed foods differ from the practical parameters that we will need to establish for our year of "unprocessed" eating. For example, refined flours are processed foods in anyone's book. However, $1400 a month might buy a lot of things (like your very own cockroach collection)in San Francisco, but it does not allow for a mill in the kitchen. So, we will continue to eat flour, but we will choose the least refined versions -- darker flours with more parts of the whole grain attached. I've listed some initial thoughts on the definition of processed foods:
*Canned
*Prepared foods (anything already made like cookies, bread, pasta, chips, etc)
*Purchased condiments (ketchup, mustard, soy sauce, etc)
*Cheese? (where does that go? are artisanal cheeses ok? kraft and cream cheese are definitely out)
*Soda
*Items with more than one ingredient
*Something that came from a factory
*Anything with preservatives or words that one struggles to pronounce (the dreaded HFCS - high fructose corn syrup is a sure no-no)
*Refined sugar (are honey or maple syrup all right because they are less processed?)

I would like your opinion! How do you define process foods? What kinds of things should we avoid? What types of seemingly processed foods can you make an exception for (think wine)?

After I sort through all the ideas, Ben and I will post the official parameters for 2010. Thanks for your help!

(The only processed foods in the burrito above are the tortilla and sour cream.)

Wednesday, November 18, 2009

Pickled Beets


Check out my recipe for pickled beets from today's Boston Globe!

Makes 2 quarts

Pickled beets are often too sweet (think Harvard beets, which are cloying) or too sour (19th-century New England cooking school teacher Fannie Farmer preserved hers with nothing more than distilled vinegar). The key to pickling beets is the right balance. Boil the brine in a stainless steel or ceramic-lined pot; avoid aluminum as it will cause off flavors. For long-term pantry storage, boiling water processing is necessary; visit the National Center for Home Food Processing at www.uga.edu/nchfp for more details. However, you can still make the beets without the rigmarole of the canning process; store them in the refrigerator; these beets will last up to 1 month on a fridge shelf. And while you may be tempted, wait at least a week for the flavors to marry. Then spoon them beside slices of cold roast turkey.

2 bunches beets, trimmed at both ends
2 cups cider vinegar
1 cup bottled water
1/3 cup brown sugar
1/3 cup granulated sugar
1 tablespoon salt
1/2 cinnamon stick, broken in half
5 whole cloves
1 teaspoon allspice berries
2 thin slices fresh ginger root
2 teaspoons whole black peppercorns

1. Have on hand two 1-quart canning jars or smaller jars that equal that amount. Rinse them with boiling water.

2. In a large pot, combine beets with cold water to cover them. Bring to a boil, lower the heat, and cover the pan. Let them bubble gently for 1 hour or until tender. Replenish water as needed.

3. Drain the beets into a colander. Rinse under cold running water until cool enough to handle.

4. Working over a plate, remove and discard the skins from the beets. Cut the beets into 1/2-inch dice. Place beets in jars, leaving enough room for brine. Set the jars on a wooden board.

5. In a nonreactive pot, combine cider vinegar, water, brown and granulated sugar, salt, cinnamon stick, cloves, allspice berries, ginger, and black peppercorns. Bring to a boil, stirring to dissolve sugars. Remove from heat and ladle over beets while the liquid is still hot. Screw on the lids.

6. Cool jars to room temperature and store in refrigerator.

http://www.boston.com/lifestyle/food/articles/2009/11/18/pickled_beets_recipe/

Thursday, November 12, 2009

Grilled Snapper with Shellfish Broth


For this dish, make sure to get the grill nice and hot. If it is too cool, the fish will stick. To time it right, place the fish on the grill right before you add the potatoes to the pot. After approximately 10 minutes, the skin will release itself from the grate when one side is fully cooked; then, you will know that it is time to flip. The skin should be brown and crispy by the time the fish is done. If snapper isn’t available, substitute branzini, dourade, or loup de mer. It is even possible to use whole walleye or large mouth bass that you caught yourself. This recipe will serve four light eaters. To make the recipe for two, use less shellfish.

Serves 4

1 teaspoon olive oil
1 red onion, chopped
1 carrot, chopped
1 yellow bell pepper, chopped
½ cup white wine
1 yukon gold potato, cut into matchsticks
1 ½ cups water
2 scallops (about 3 ounces), sliced in half horizontally
3 ounces shrimp, peeled and de-veined
4 oysters, shucked
3 ounces crabmeat
Zest and juice of one lemon
1 tablespoon chopped parsley
Salt and pepper, to taste
3 cloves garlic, sliced
1 bunch spinach

1. In a heavy-bottomed pot, heat olive oil over medium heat. Add red onion, carrot, and bell pepper. Stir; cook for one minute. Add white wine; cover and cook for 5 minutes.
2. Add potatoes and water; stir. Cover and cook for 10 minutes, stirring occasionally.
3. Add scallops; cook for 3 minutes, covered. Add shrimp; cook for 1 minute. Remove pot from heat; add oysters and crabmeat. Stir in lemon zest and parsley. Season with salt and pepper. Set aside, covered.
4. Heat a large sauté pan over high heat. Add garlic and ¼ cup wine; bring liquid to a simmer. Add spinach; cook until the leaves are wilted and the liquid is evaporated. Season with salt and pepper.
5. Arrange spinach on a large platter. Arrange vegetables, shellfish, and broth on top of spinach. Set grilled fish on top. Serve tableside.

FISH
1 whole snapper (about 1 ¼ pounds), scaled and gutted
2 tablespoons olive oil
Salt and pepper, to taste

1. Heat a gas or charcoal grill until very hot.
2. Score the skin of the fish with two long diagonal slits on both sides.
3. Brush the fish with olive oil and season with salt and pepper. Season the inside cavity of the fish as well as the skin.
4. Place directly over hottest coals or in the hottest area of a gas grill. Cook for 20 minutes or until skin is crispy and flesh yields slightly to the touch.

Wednesday, November 11, 2009

Pantry Basics


For a while, my baby brother and I were living together (with Ben, of course) in Boston. We also worked at the same bakery/cafe -- where we eagerly staked claim on all the leftover goodies that would otherwise be thrown away. Needless to say, our grocery bills were quite low, and prep time for dinners was minimal. When Ben and I left Boston, Mike stayed behind to finish college. He continued working at the bakery (read: scrounging free food) until a unique research position became available. While he might have been ready to bid farewell to a bustling and often stressful place of work, he was not quite ready to give up the perks.

These days, Mike is cooking for himself -- learning how to nourish himself on a budget with all the free time that an employed, full-time student can muster. He asked me to assemble a list of essential pantry goods that meet the following criteria: inexpensive, easy to prepare, and a long shelf life. (Save the science experiments for school -- we all know what an undergraduate refrigerator can look like.) This is what I came up with:

1. Kosher or sea salt
2. Black pepper
3. Sweet Hungarian paprika
4. Rice (brown or basmati)
5. Dried brown lentils
6. Pinto beans (preferably dried but canned is also ok)
7. Stubby pasta shape (smaller shapes lend themselves to healthier sauces)
8. All purpose flour
9. Baking powder and/or soda
10. Oil packed anchovies (best in a re-sealable jar)
11. Hot sauce (something versatile like Tabasco or Sambal Olek)
12. Honey
13. Soy sauce
14. Canola Oil
15. Extra virgin olive oil
16. Red wine vinegar
17. Canned tuna
18. Onions
19. Garlic
20. Sun-dried or canned tomatoes
21. Lemons
22. Fresh or dried thyme
23. Parmesan cheese
24. Frozen legumes (peas, hulled edamame, lima beans)
25. Eggs

Some of these items will not grace our own pantry during our "Unprocessed" year, but they are all healthy choices. After all, not everyone has the time or resources to engage in such a project. Suggestions above are minimally processed and/or nutrient or flavor dense.

Choose brown or basmati rice. These are lower on the glycemic index chart than white rice; the starches are absorbed into the blood stream at a slower rate, making it a better choice for people who are insulin resistant. When possible, opt for whole wheat pasta to remove some of the white flour from your diet. Hot sauce, honey, soy sauce, garlic, and Parmesan cheese offer big bang for your buck, boosting otherwise drab bowls of beans and rice. Anchovies provide the double whammy of essential fatty acids as well as enormous amounts of flavor packed into just a sliver. Frozen peas etc. add a little green for vitamins; they keep for a long time, and they cook quickly. Eggs are a great source of inexpensive protein that stay fresh for longer than you might think. Try a runny-yolk egg on top of a bowl of lentils for a hearty, protein-rich meal with an impromptu "sauce".

I haven't listed fruit and vegetables because I don't consider them part of the basic pantry. Instead, I try to pick up a daily selection of each from a small, local market, keeping things fresh and eliminating waste. When shopping on a budget, seek out ethnic grocery stores; the prices are often much lower than larger chain counterparts.

Pictured above on the day that my new brother came home from the hospital. (I promise that this is the last of the old family photos for a while. More mouth-watering food pics to come!)

Tuesday, November 10, 2009

The "Why"


In previous posts, I’ve alluded to something called “Unprocessed”. I’m finally going to tell you what that means. In many ways, 2009 was the most remarkable year of my marriage. My husband and I took a giant risk by quitting our jobs, moving to South America, returning to make the trip from one coast to the other, and settling in this great city by the bay. In other ways, this past year wasn’t so hot. Just before we left for our trip, my cousin, then 16, was diagnosed with type 1 diabetes (also referred to as juvenile diabetes). This fall, I learned that my father-in-law developed type 2 diabetes (adult onset) along with other serious complications. Only a few weeks later, I lost my grandmother, who had been struggling with diabetes for many years. That same week, a young cousin, who had type 1 diabetes since early childhood, passed away. When I think back, these aren’t the only examples – a cousin with gestational diabetes, a grandfather-in-law with type 2, my dad’s cousin who suffered an amputation and passed away from heart problems associated with diabetes – sometimes it seems as if it is easier to count relatives who have not been affected. With almost 24 million American diabetics, this is no surprise.

While I am not technically a diabetic, my doctors have labeled me as “pre-diabetic” – a condition indicating elevated blood glucose levels which means that I am also slightly insulin resistant. How did I get this way? Just before college graduation, I began to notice that my hair was thinning, and I was gaining a lot of weight – even more than the standard freshmen 15. My doctors discovered that my thyroid was relatively inactive, a condition known as hypothyroidism. The thyroid is a gland found in the neck/throat which regulates many of the body’s metabolic activities. I began taking synthetic thyroid hormone and my symptoms stabilized. However, a few years later, things worsened. I continued to battle weight issues and without hormonal regulation, my menstrual periods were absent. This time, it was my gynecologist who informed me that I have PCOS (polycystic ovary syndrome) – a hormonal imbalance whose symptoms manifest as infertility, insulin resistance, acne, hair loss, abdominal fat, facial hair, fatigue, and depression. People with PCOS often have thyroid disorders as well. Awesome. All this is not to say that I should run out and audition for the role of Dom DeLuise in the made for t.v. movie about his life. The birth control pill provides necessary estrogen, and metformin, a commonly prescribed diabetes drug, helps stabilize blood glucose levels and assists with maintaining a healthy weight. Yet, the most important “treatment” is the old standby of diet and exercise. Many patients have found that an active lifestyle combined with a diet that is low in saturated fat, sugar, and sodium actually eliminates most of their symptoms.

This blog is my attempt to better care for my own health needs and to provide a resource for friends and family who want to eat for their health. I am not a doctor, nor am I a nutritionist, but what I can share are my own experiences and recipes. Beginning in 2010, my husband, Ben, and I will embark on a quest to remove as many processed foods as possible from our diet. The idea is to eat healthier, cook for ourselves, and eliminate many of the foods that are thought to contribute to our nation’s health crisis. We are calling this project “Unprocessed.” As we start to solidify our ideas, I will continue to post about the details, including parameters for the year.

Pictured above with my grandmother -- back when fat and bald was absolutely adorable!

Monday, November 9, 2009

One Irish Breakfast, Hold the Heart Attack


Last week's Thursday brunch was more practice for "Unprocessed". Traditional Irish breakfast includes baked beans, brown bread, a fried egg, broiled tomatoes, and a several big, greasy sausages. I lightened it up a little. Baked beans included homemade ketchup -- recipe to come. It's easier than you think! Our egg was poached, and we eliminated the pork fat all together. There's nothing I love more than lard encased in intestine (seriously), but it doesn't seem to fit into daily eating. Brown bread was surprisingly easy. I borrowed a recipe from Mark Bittman's blog, Bitten.

Margaret Hickey’s Irish Brown Bread
Yield 1 loaf

Ingredients
3 cups extra coarse wholemeal flour
1 cup oat bran
3 tablespoons wheat germ
1/2 cup all-purpose flour
1 teaspoon salt
1 teaspoon baking soda
3 teaspoons baking powder
1 egg, beaten
2 cups milk

Method
1. Combine first seven ingredients and fluff together with hands to mix in the baking soda and baking powder completely.
2. Add egg and milk and stir to combine until it has the consistency and appearance of oatmeal.
3. Spray and flour a 9” round baking pan. Pour in batter and score the top with a cross. (“You’re wishing the bread well as it goes into the oven,” says Margaret.)
4. Bake at 380 degrees for one hour. Cool on a rack completely before cutting. Can be kept out for a day or two, but otherwise needs to be refrigerated or frozen.


I took their suggestion and substituted buttermilk for the milk, giving it a slightly zippier feeling. I also subbed out 1/3 cup of whole wheat flour and instead used ground flaxseed. Flaxseed is high in fiber, omega-3s, and phytonutrients -- making it great for your digestive tract, skin, hair and nails. Use it in baking recipes like this one or sprinkle it on oatmeal or yogurt. I store mine in the freezer to extend the shelf life. Even with the best of intentions, it's difficult to eat a 14 ounce bag before it would go rancid sitting on the counter. Brown bread is the perfect treat when you are looking for a compact, efficient colon broom!

Just in case you think we've lost our midwestern sensibilities, note the pint of Guinness -- requisite for breakfast.

Friday, November 6, 2009

All About Me

Well, I suppose I could give this post an AA feeling by starting things out like this, "Hi, my name is Karoline. I'm 29 years old, and I'm having a mid-life crisis." That pretty much sums things up these days. So, I joined the millions of other people who air their dirty laundry on the internet with the hopes that it will somehow help me to find purpose and meaning in my life. Sound familiar?

Let's back things up a little to give you an idea of how I arrived at said mid-life crisis. I grew up in a snooty Chicago suburb, and like the half of my high school who did not attend Northwestern or Harvard, I went to the University of Illinois. Because my dad's an attorney, I got it in my confused, yet-to-be-fully-formed brain that I should follow a pre-law track. Poli sci and Spanish it was. Fortunately for the rest of the attorneys out there, I spent an ungodly amount of time studying abroad in Brazil, Spain, Austria, and Cuba where I found my true love: eating. Well, I also fell in love with beer, wine, and all other alcoholic beverages, but that is fodder for another post and another meeting.

I graduated from college early, and I started waiting tables to pay for cooking classes. After a few grueling years of living out of my car, I snagged a studio apartment in Lincoln Park and spent my nights slinging pans as a line cook and my mornings baking pastries just to cover the rent. Don't be led astray...that doesn't mean I didn't have any fun. I partied hard enough to meet my husband (well, we did meet at a work function), get him sufficiently sloshed, and convince him to marry me and move to Boston -- all in the span of a few short months.

Ahhh, Boston...I love that dirty water. Not really. If cities are like spouses, Boston was the product of an arranged marriage who I quickly made my ex. I enrolled in Boston University's master's program in gastronomy, and for four years, I slaved as a pastry chef, student, and freelance writer/ stylist. When the time came, I was glad to leave it behind.

Not quite finished with grad school, I spent four months living in Argentina where I researched my final thesis. Yes, by research I mean that I drank copius quantities of malbec with the hopes of discovering the who, what, and why of the world's current obesession with the grape.

With no place to return to stateside, we decided to try out the west coast. So, we packed up the car and drove to San Francisco on a whim. We didn't have jobs or an apartment. Heck, I hadn't even set foot in CA except for the time I went to Disneyland when I was ten. But, something told me that San Francisco was the place for me. I know that doesn't make me unique -- this city attracts all the crazies and wayward souls. That's why I love it. That, and the amazing food scene.

So, here I am: rapidly approaching the big 3-0, baking sourdough for a living, and desperately trying to find myself. Yet with all the yoga, lifecoaching, and rolling fog, one thing remains certain. I love food.

Thursday, November 5, 2009

A little something to wet your appetite


Farro with mushrooms and asparagus
Meredith Berger, nutrition intern at Emerson Hospital, says, “Whenever I make a grain dish, I try to beef it up with some finely chopped vegetables to make the grain portion size smaller but be just as filling.” In this case, farro, rated medium on the glycemic index, is beefed up with asparagus and mushrooms. The addition of protein-rich chicken stock and sherry vinegar lower the overall GI of the dish. The cereal is an ancient cousin to modern day wheat and sometimes known as emmer wheat. High in B vitamins but low in gluten, it may be tolerated by some with wheat allergies. Choose the semi-pearled version, as it cooks faster than the whole grain. Farro is often cooked like rice or pasta. For this recipe, boil the kernels first and then transfer to a skillet to absorb the flavors of the sauce. To make the dish vegetarian, soak the mushrooms in 2 cups of water; reserve it and use in place of chicken stock.

Serves 4

1 ounce dried mushrooms
8 ounces semi-pearled farro
1 tablespoon olive oil
1 medium onion, chopped
2 cloves garlic, minced
1 tablespoon chopped fresh thyme
3 tablespoons sherry vinegar
2 cups chicken stock
1 bunch asparagus, cut into 1/4 inch pieces
Salt and pepper, to taste

1. In a small bowl, cover dried mushrooms with warm water. Soak for 25 minutes, or until softened. Drain the mushrooms, and discard the soaking water. Chop finely.
2. Bring a large pot of water to a boil. Add farro, and cook for 10 minutes, stirring occasionally. Drain and reserve.
3. In a large skillet, over medium heat, heat the olive oil. Add onion, garlic, thyme, and mushrooms. Cook, stirring occasionally, for 5 minutes or until onions are tender. Stir in 2 tablespoons of sherry vinegar. Continue cooking for 1 minute.
4. Add chicken stock, and bring it to a boil. Stir in farro, and return to a boil. Lower the heat to a simmer, and cover with a tight fitting lid. Cook for 10 minutes. Add asparagus. Cook, covered, for an additional 10 minutes.
5. Season with 1 tablespoon sherry vinegar, salt and pepper.

More about who I am in upcoming posts...